You’re done purchasing a camping tent and all the necessary kits and now, you’re off to your most-awaited weekend getaway. So what’s the next step? Before meeting the great outdoors, you should first learn how to pitch your tent correctly.
Pitching a tent is an essential skill that every camper and outdoor enthusiast should know. Maybe you’re thinking, “it’s darn easy to pitch a tent!”. If you’re a first-time camper and you plan to bring a huge tent, I’m telling you – IT IS NOT.
Aside from the fact that you’ll likely sweat profusely for a good 30 minutes to 1 hour of reading the instruction manual that comes with the tent and incessantly shifting from one corner of the tent to another, you’ll also be surprised (and disappointed) that the tent you worked so hard for isn’t sturdy enough and wouldn’t stand a chance against the wind.
Now, to make your life easier and to save time, I’m sharing with you some tips on how to pitch your tent and also the proper way of pitching.
If you have an outdoor lawn or a spacious area in your living room, you should utilize it for practising how to pitch a tent.
Certainly, it’s less embarrassing to struggle in building the tent where no one’s around to watch you than to take the struggle right on the camping spot. Most importantly, it’ll save you a lot of time and sweat that you can invest instead on your relaxing break.
The best way to learn, as they say, is by experience. But learning from others’ experiences and mistakes is a more efficient way of learning. All you need to do is to sit back, relax, and read this article up to the end.
So, shall we get started?
Where To Pitch
First things first, you should know where the perfect spot is for pitching. Setting up a tent is all about finding the right location.
Choosing an ideal place will secure your tent from destruction and will also protect you from harm and the elements. Most importantly, it will significantly impact your comfort and will give you peace of mind. After all, camping is all about peace of mind and body.
So before setting camp, allocate a few minutes to scout the area and select the perfect spot.
1. When Convenience Is Your Top Priority
If you’re one who likes to be near amenities for comfort, then you should go for spots adjacent to them. If you need to frequent the loos and food stores, then you should choose a spot near them.
Going to a campground, established public and private campgrounds offer campsites that are proximate to the loos and other facilities of the area.
The only disadvantage that I have experienced with choosing spots near public conveniences is that people tend to pass and walk around your pitch often. I find it very uncomfortable.
2. Pitch On Flat Grounds
At all times! This is pretty self-explanatory. Of course, you can’t pitch on a hill or valley. Amateur campers may think that it’s a good idea to set camp in a valley because it’ll be a natural barricade to wind but it’s actually dangerous because flash floods and landslides are inevitable.
It’s easier to pitch your tent on flat ground, and it will also be much easier for you to lay your back on flat ground. When you finally found the perfect pitching site, brush away the debris – litter, twigs, and rocks from the ground using your foot before setting up the tent.
If unfortunately, there’s no flat ground anywhere, you may have to look for and settle on slightly sloping ground. Upon setting the tent, lay inside look for a comfortable position with your head on the elevated slope and your feet on the downhill side.
3. Select A Shaded Spot
Exposure to the scorching heat of the sun translates to discomfort and ultimately, sunburn. Also, the direct rays of the sun will cause your tent to age prematurely, no matter how expensive and high-quality your tent is.
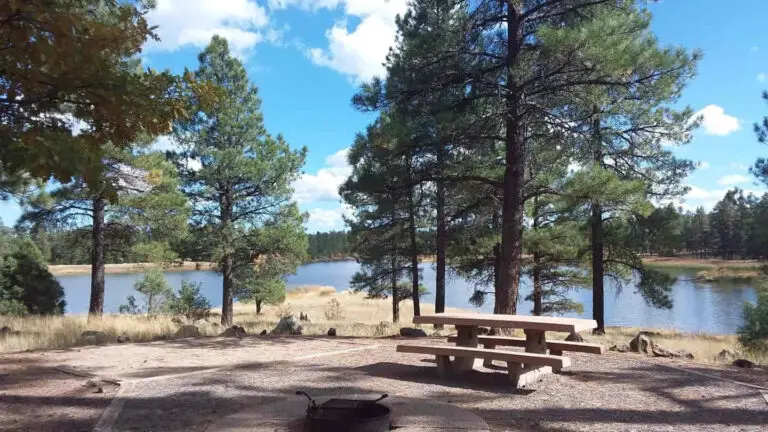
A flat ground overshadowed with trees will be a great spot.
4. Choose A Spot With A Natural Windbreak
Strong night winds will basically cause your tent to flap in all directions. Additionally, it creates a cool atmosphere inside the tent which is unbearable when camping.
What I do is I scout for a shaded spot and set up the tent in a way that the door is facing against the barricade and away from the wind.
5. Camp Meters Away From Water
Lakes sides and beaches are wonderful places to camp because it serves as a water source for bathing and other purposes. Most campers mistakenly think that camping near water forms is a great option because of accessibility.
Based on a lot of personal and other campers’ experiences, camping near the waters subjects one to floods, contaminated supplies, and sudden rising of the tides which will definitely wash the tent away.
A few years back, I and some college friends camped a meter away from the beach and boy, our wet shirts woke us up, and we’re surprised to find that we’re floating 2 inches from the sand! It’s definitely a bad experience because all our clothes got soaking wet and some of the food we packed floated away from us. But it was fun, and we learned from it.
How To Pitch A Tent
Pitching is a tiring task! To save up time, practice pitching the tent in your yard or living room and read the instruction manual that comes with the tent first.
1. Lay The Tent Tarp/Footprint
The tent tarp or footprint is an exceptionally useful addition to your camping gear because it provides protection on the bottom of your tent while also doing the job of preventing water from pooling on your tent in case of rainfall.
Also, it serves as the “layout” for the shape of the tent. After laying it on the ground, secure it with stakes or pegs. Commercial tarps and footprints are fully equipped with pegs but if you plan to make your own, which is a money-saver, you have to buy some materials.
I made an article for making your own tent tarp/footprint. Check it out. It might be helpful.
2. Unpack Your Camping Gear
Take out the tent from its case, together with the pegs and poles. Set the poles and pegs aside and lay the tent flatly on top of the tarp. Check if all the parts are accounted for.
3. Assemble The Tent
Before going to the steps, let’s first look at the different types of tents used for camping because each of them is assembled differently.
The A-frame tents, tunnel tents, and family-sized dome tents are the conventional tents used for camping. A-frame tents are what we usually use whereas the dome tent is the larger version of the A-frame tent and it’s more self-supporting than A-tents. Lastly, we have the elongated tunnel tents which look like “coffins”.
The A-frame tent and dome tents are assembled similarly. Get the two collapsible poles and place them on the ground. Straighten out the folded poles and pin them on top of each other.
Start inserting one pole on opposite corners of the flattened tent. You can do this in two ways:
- By starting out in the middle sleeve and working your way towards the opposite ends.
- Start on one end and work your way up to the middle sleeve and onto the other end.
Do whatever works for you.
For the tunnel tent, insert the poles on parallel corners until you reach the other ends.
Gently stretch the canvas cloth while applying pressure on adding the poles to the right sleeves until you reach the other corner of the tent.
4. Secure The Pegs
The tent will eventually rise and conclude its shape as you insert and apply force while you insert poles on all corners of the tent. Help the tent up a little and secure the poles in their places.
What you need to do now is to secure the corners with pegs, so the tent stays on the ground. Tent corners have holes where pegs are punched on. Get you pegs and a medium-sized rock. Start hammering the pegs in place.
If somehow you forgot or misplaced your pegs, you can use a sturdy tree branch than can fit in the corner holes. Just cut the branches into four and hammer it down.
5. Attach The Flysheet
Tents may be waterproof, but they still need that “little reinforcement” in the form of a fly sheet/ rain fly. A flysheet is considered as the “outer tent” and it’s a piece of cloth that basically looks like the exterior of a tent. You should hook it over the tent for extra protection against the rain.
Even though you’ve checked the weather forecast and it’s not going to rain within your stay, it wouldn’t hurt to install the flysheet still. I’ve always taken fly sheets for granted back then and I never actually use it on sunny days, but yes, I learned the hard way.
To attach the flysheet, throw it over the top of the tent while aligning it with the poles. Some fly sheets have velcros that you can just stick to the tent while some comes with guy ropes for pinning the tent into the ground. The guy ropes adds stability to the flysheet and consequently, the tent under it.
If your flysheet comes with guy ropes, there’ll be a hole for the rope insertion. The next step is to take the free end of the rope and make a loop then attach the rope loop into the flysheet’s hole and pull the line through.
Lastly, take out a peg and hook the guy rope on the curved part of the rope then hammer the peg into the ground. Check out the video below for a more detailed step.
Voila, your tent’s all set up! Below’s a video of pitching a tent to summarize things up.
Read More: New York’s Hidden Gem: The Minnewaska State Park Preserve
Final Thought
Pitching a tent won’t be complicated if you learn how to set it up properly beforehand. Now that we’ve shown you where and how to pitch your precious tent, I’m sure you’ll have more time for the other things that matter like bonding with your family and friends and also, marveling at the beauty of the great outdoors. Camping really does wonders for the soul!
Hey fellow camper, do you have some tips or tricks for pitching a tent? What are those? Comment your thoughts below! Did you find this article useful? Share it to show your love and appreciation!

I’m Cindy, a free-spirited outdoor enthusiast. Since childhood, Our family frequently goes on weekend camps and my father, who was a skilled hunter, used to teach my siblings and me valuable things about wildlife survival. I made this blog to share my knowledge, experiences, and tips.